
 About
About
 Termini e Condizioni
 Privacy

AskJBoss Visuals — Your Story Through Our Lens.
1 persone piace questo elemento
12 Articoli
23 Foto
0 Video
0
Anteprima
-
# 📸 Photography for Beginners — Lesson 5: Portrait Photography
Portrait photography is about more than simply photographing someone's face. The goal is to **show the person's personality, emotion, and character**.
## 1. Find Good Light
**Light is the most important part of a portrait.**
For beginners, natural window light is an excellent place to start.
Try placing your subject near a window and position them so that the light falls gently across their face.
Avoid extremely harsh sunlight directly overhead because it can create strong shadows under the eyes and nose.
### Try this:
📷 Put your subject beside a window.
Take one photograph with them facing the window.
Then turn them approximately 45° away from the window.
Compare the two photographs.
---
## 2. Focus on the Eyes 👁️
When photographing a person, the eyes are usually the most important part of the portrait.
Make sure the eyes are sharp and in focus.
If your camera has **Eye AF / Eye Detection**, turn it on.
For a close portrait, even a small focusing error can make the photograph look soft.
---
## 3. Choose Your Background Carefully
A distracting background can ruin an otherwise excellent portrait.
Before pressing the shutter, look behind your subject.
Remove or avoid things such as:
* Clutter
* Bright objects
* Trash
* Random people
* Distracting signs
* Objects appearing to come out of the person's head
A simple background often produces a stronger portrait.
---
## 4. Create Background Blur
Remember what we learned about **aperture in Lesson 3**?
A wider aperture such as:
**f/1.8 – f/2.8**
can produce a shallow depth of field and blur the background.
This helps separate your subject from their surroundings.
For example:
**Subject:** sharp
**Background:** soft and blurred
This is often called **bokeh** when the out-of-focus areas have an aesthetically pleasing appearance.
---
## 5. Don't Cut People at Awkward Places
When composing a portrait, be careful where you crop the body.
Avoid cropping directly through areas such as:
* Joints
* Knees
* Elbows
Instead, crop between joints when appropriate.
For a beginner, try these common portrait compositions:
**Headshot:** Head and shoulders
**Medium portrait:** Waist or chest upward
**Full-body portrait:** Entire person visible
---
## 6. Give Your Subject Something to Do
People often become uncomfortable when you simply say:
> "Stand there and smile."
Instead, give them a simple action.
Ask them to:
* Walk toward you
* Look away from the camera
* Adjust their clothing
* Touch their hair
* Sit down
* Lean against a wall
* Look through a window
* Laugh naturally
This can produce much more natural photographs.
---
# 📐 7. Experiment With Camera Angles
Try photographing the same person from different positions.
### Eye level
Natural and realistic.
### Slightly above eye level
Can produce a flattering perspective.
### Low angle
Can make the person appear stronger or more imposing.
### Side angle
Can emphasize facial shape and create a more dramatic portrait.
Don't rely on only one angle.
---
# 🎯 Lesson 5 Practical Exercise
Find a friend or family member and take **12 portraits**.
### Set 1 — Lighting
Take 3 photographs using different light directions.
### Set 2 — Composition
Take:
* 1 headshot
* 1 medium portrait
* 1 full-body portrait
### Set 3 — Background
Take 3 photographs with different backgrounds.
### Set 4 — Angles
Take 3 photographs from:
* Eye level
* Slightly above
* Slightly below
Then choose your **best 3 portraits**.
Ask yourself:
**1. Are the eyes sharp?**
**2. Is the lighting flattering?**
**3. Is the background distracting?**
**4. Is the subject positioned well?**
**5. Does the photograph communicate an emotion?**
---
## 🧠 Lesson 5 Key Rule
Remember:
> **Good portrait photography is not just about making someone look beautiful. It's about making the viewer feel something.**
### 📚 Next Lesson — Lesson 6
**Photography Lighting Fundamentals: Natural Light, Artificial Light, Golden Hour, Shadows, Direction of Light, and How to Create Dramatic Photos.**# 📸 Photography for Beginners — Lesson 5: Portrait Photography Portrait photography is about more than simply photographing someone's face. The goal is to **show the person's personality, emotion, and character**. ## 1. Find Good Light **Light is the most important part of a portrait.** For beginners, natural window light is an excellent place to start. Try placing your subject near a window and position them so that the light falls gently across their face. Avoid extremely harsh sunlight directly overhead because it can create strong shadows under the eyes and nose. ### Try this: 📷 Put your subject beside a window. Take one photograph with them facing the window. Then turn them approximately 45° away from the window. Compare the two photographs. --- ## 2. Focus on the Eyes 👁️ When photographing a person, the eyes are usually the most important part of the portrait. Make sure the eyes are sharp and in focus. If your camera has **Eye AF / Eye Detection**, turn it on. For a close portrait, even a small focusing error can make the photograph look soft. --- ## 3. Choose Your Background Carefully A distracting background can ruin an otherwise excellent portrait. Before pressing the shutter, look behind your subject. Remove or avoid things such as: * Clutter * Bright objects * Trash * Random people * Distracting signs * Objects appearing to come out of the person's head A simple background often produces a stronger portrait. --- ## 4. Create Background Blur Remember what we learned about **aperture in Lesson 3**? A wider aperture such as: **f/1.8 – f/2.8** can produce a shallow depth of field and blur the background. This helps separate your subject from their surroundings. For example: **Subject:** sharp **Background:** soft and blurred This is often called **bokeh** when the out-of-focus areas have an aesthetically pleasing appearance. --- ## 5. Don't Cut People at Awkward Places When composing a portrait, be careful where you crop the body. Avoid cropping directly through areas such as: * Joints * Knees * Elbows Instead, crop between joints when appropriate. For a beginner, try these common portrait compositions: **Headshot:** Head and shoulders **Medium portrait:** Waist or chest upward **Full-body portrait:** Entire person visible --- ## 6. Give Your Subject Something to Do People often become uncomfortable when you simply say: > "Stand there and smile." Instead, give them a simple action. Ask them to: * Walk toward you * Look away from the camera * Adjust their clothing * Touch their hair * Sit down * Lean against a wall * Look through a window * Laugh naturally This can produce much more natural photographs. --- # 📐 7. Experiment With Camera Angles Try photographing the same person from different positions. ### Eye level Natural and realistic. ### Slightly above eye level Can produce a flattering perspective. ### Low angle Can make the person appear stronger or more imposing. ### Side angle Can emphasize facial shape and create a more dramatic portrait. Don't rely on only one angle. --- # 🎯 Lesson 5 Practical Exercise Find a friend or family member and take **12 portraits**. ### Set 1 — Lighting Take 3 photographs using different light directions. ### Set 2 — Composition Take: * 1 headshot * 1 medium portrait * 1 full-body portrait ### Set 3 — Background Take 3 photographs with different backgrounds. ### Set 4 — Angles Take 3 photographs from: * Eye level * Slightly above * Slightly below Then choose your **best 3 portraits**. Ask yourself: **1. Are the eyes sharp?** **2. Is the lighting flattering?** **3. Is the background distracting?** **4. Is the subject positioned well?** **5. Does the photograph communicate an emotion?** --- ## 🧠 Lesson 5 Key Rule Remember: > **Good portrait photography is not just about making someone look beautiful. It's about making the viewer feel something.** ### 📚 Next Lesson — Lesson 6 **Photography Lighting Fundamentals: Natural Light, Artificial Light, Golden Hour, Shadows, Direction of Light, and How to Create Dramatic Photos.**0 Commenti ·0 condivisioni ·1K Views ·0 Anteprima -
# 📸 Photography for Beginners — Lesson 4: Composition
**Composition** is the way you arrange elements inside your photograph. Good composition can make an ordinary scene look much more professional.
## 1. Rule of Thirds
Imagine your photograph divided into **9 equal sections** using two horizontal and two vertical lines.
Instead of placing your subject directly in the center, try placing it where the lines intersect.
📷 **Example:** If you're photographing a person, position their eyes around one of the upper intersections.
**Tip:** Most cameras and smartphones allow you to turn on a **grid** to help with this.
---
## 2. Leading Lines
Leading lines are lines that guide the viewer's eyes toward your subject.
Examples include:
* Roads
* Bridges
* Buildings
* Fences
* Railway tracks
* Walls
* Shadows
For example, you could photograph a person standing at the end of a road, with the road leading toward them.
**Goal:** Use lines to tell the viewer where to look.
---
## 3. Natural Framing
Use objects around your subject to create a **frame within the photograph**.
You can use:
* Doors
* Windows
* Trees
* Arches
* Buildings
* Curtains
For example, photographing someone through a doorway can naturally draw attention to them.
---
## 4. Symmetry
Symmetry occurs when one side of an image mirrors the other.
Examples:
* Architecture
* Reflections in water
* Long corridors
* Roads
* Buildings
Symmetrical photographs can look very clean and powerful.
---
## 5. Negative Space
**Negative space** is the empty area around your main subject.
For example, imagine photographing a person standing on the beach with a large area of sky around them.
The empty space makes the subject stand out.
Don't be afraid of empty areas in your photographs. **Empty space can be part of the composition.**
---
## 6. Change Your Camera Position
One of the easiest ways to improve your photography is to **stop taking every photograph from eye level**.
Try:
📷 **Low angle** — place the camera close to the ground.
📷 **High angle** — photograph from above.
📷 **Eye level** — natural and realistic.
📷 **Side angle** — creates a different perspective.
📷 **Close-up** — emphasize details.
Before taking a photograph, ask yourself:
> **"Can I take this from a more interesting position?"**
---
# 🎯 Lesson 4 Practice
Today, take **10 photographs**.
Try to create:
1. **2 Rule-of-Thirds photos**
2. **2 Leading-Line photos**
3. **2 Symmetry photos**
4. **2 Natural-Framing photos**
5. **2 Negative-Space photos**
Don't worry about having an expensive camera.
Your goal is to **train your eyes to see composition**.
### 📚 Your Assignment
Choose your **best 3 photographs** from today's exercise and examine them.
For each one, identify:
* What is the main subject?
* Where is the subject positioned?
* What lines are visible?
* Is there empty space?
* What makes the viewer look at the subject?
---
### Next Lesson 📷
**Lesson 5: Portrait Photography — How to Take Better Photos of People**
We'll learn about **lighting, posing, camera angles, background selection, focusing on the eyes, and creating professional-looking portraits.**# 📸 Photography for Beginners — Lesson 4: Composition **Composition** is the way you arrange elements inside your photograph. Good composition can make an ordinary scene look much more professional. ## 1. Rule of Thirds Imagine your photograph divided into **9 equal sections** using two horizontal and two vertical lines. Instead of placing your subject directly in the center, try placing it where the lines intersect. 📷 **Example:** If you're photographing a person, position their eyes around one of the upper intersections. **Tip:** Most cameras and smartphones allow you to turn on a **grid** to help with this. --- ## 2. Leading Lines Leading lines are lines that guide the viewer's eyes toward your subject. Examples include: * Roads * Bridges * Buildings * Fences * Railway tracks * Walls * Shadows For example, you could photograph a person standing at the end of a road, with the road leading toward them. **Goal:** Use lines to tell the viewer where to look. --- ## 3. Natural Framing Use objects around your subject to create a **frame within the photograph**. You can use: * Doors * Windows * Trees * Arches * Buildings * Curtains For example, photographing someone through a doorway can naturally draw attention to them. --- ## 4. Symmetry Symmetry occurs when one side of an image mirrors the other. Examples: * Architecture * Reflections in water * Long corridors * Roads * Buildings Symmetrical photographs can look very clean and powerful. --- ## 5. Negative Space **Negative space** is the empty area around your main subject. For example, imagine photographing a person standing on the beach with a large area of sky around them. The empty space makes the subject stand out. Don't be afraid of empty areas in your photographs. **Empty space can be part of the composition.** --- ## 6. Change Your Camera Position One of the easiest ways to improve your photography is to **stop taking every photograph from eye level**. Try: 📷 **Low angle** — place the camera close to the ground. 📷 **High angle** — photograph from above. 📷 **Eye level** — natural and realistic. 📷 **Side angle** — creates a different perspective. 📷 **Close-up** — emphasize details. Before taking a photograph, ask yourself: > **"Can I take this from a more interesting position?"** --- # 🎯 Lesson 4 Practice Today, take **10 photographs**. Try to create: 1. **2 Rule-of-Thirds photos** 2. **2 Leading-Line photos** 3. **2 Symmetry photos** 4. **2 Natural-Framing photos** 5. **2 Negative-Space photos** Don't worry about having an expensive camera. Your goal is to **train your eyes to see composition**. ### 📚 Your Assignment Choose your **best 3 photographs** from today's exercise and examine them. For each one, identify: * What is the main subject? * Where is the subject positioned? * What lines are visible? * Is there empty space? * What makes the viewer look at the subject? --- ### Next Lesson 📷 **Lesson 5: Portrait Photography — How to Take Better Photos of People** We'll learn about **lighting, posing, camera angles, background selection, focusing on the eyes, and creating professional-looking portraits.**0 Commenti ·0 condivisioni ·1K Views ·0 Anteprima -
Absolutely. Let’s continue with **Photography for Beginners — Lesson 3**.
# 📸 Lesson 3: Understanding Camera Exposure
Exposure is one of the most important concepts in photography. It determines **how bright or dark your photograph appears**.
The three main elements controlling exposure are called the **Exposure Triangle**:
1. **Aperture**
2. **Shutter Speed**
3. **ISO**
### 1. Aperture — How Much Light Enters
Aperture controls the size of the opening inside your lens.
It is written as **f-numbers**, such as:
* f/1.4
* f/2
* f/2.8
* f/4
* f/5.6
* f/8
* f/11
* f/16
**Important:** A smaller f-number means a **larger opening** and more light.
For example:
**f/1.8 → lots of light + blurry background**
**f/11 → less light + more of the scene in focus**
A wide aperture such as **f/1.8** is excellent for portraits because it can separate the person from the background.
---
### 2. Shutter Speed — How Long the Camera Captures Light
Shutter speed determines how long your camera's shutter stays open.
Examples:
* 1/1000 sec → very fast
* 1/500 sec → fast
* 1/250 sec → moderate
* 1/60 sec → relatively slow
* 1 sec → very slow
A **fast shutter speed** can freeze movement.
📸 Example: photographing a football player running.
A **slow shutter speed** can create motion blur.
📸 Example: photographing moving water and creating a smooth, flowing effect.
---
### 3. ISO — Camera Sensor Sensitivity
ISO controls how strongly your camera sensor responds to light.
Common ISO values include:
* ISO 100
* ISO 200
* ISO 400
* ISO 800
* ISO 1600
* ISO 3200
* ISO 6400
Generally:
**Low ISO = cleaner image**
**High ISO = brighter image but potentially more noise/grain**
Use ISO 100–200 when there is plenty of light.
Use higher ISO values when you're shooting in darker environments and need to maintain a usable shutter speed.
---
## 🔺 How the Three Work Together
Imagine you're taking a portrait outdoors.
You choose:
**Aperture:** f/2.8
**Shutter:** 1/250 sec
**ISO:** 100
This gives you:
* A reasonably bright image
* A blurred background
* Enough shutter speed to reduce camera shake and subject movement
* Low image noise
But if your photograph is too dark, you could:
* Open the aperture → f/2.8 to f/2
* Slow the shutter → 1/250 to 1/125
* Increase ISO → 100 to 200
The key is understanding **what you want to change creatively**, rather than simply making the image brighter.
---
# 🎯 Beginner Exercise
Take your camera or phone outside and photograph the **same subject three times**.
### Photo 1 — Aperture
If your camera allows manual controls, keep ISO and shutter speed relatively constant and change the aperture.
Try:
**f/2.8 → f/5.6 → f/11**
Look at how the background and overall brightness change.
### Photo 2 — Shutter Speed
Photograph a moving subject using:
**1/1000 → 1/250 → 1/30**
Observe the difference in motion.
### Photo 3 — ISO
Take the same photograph using:
**ISO 100 → ISO 800 → ISO 3200**
Zoom into the images and look for differences in **noise/grain**.
---
## 📝 What You Should Remember
Think of the Exposure Triangle like this:
**Aperture → controls light + depth of field**
**Shutter Speed → controls light + motion**
**ISO → controls brightness + image noise**
Once you understand these three controls, you'll have much more creative control over your photography.
### Next Lesson 📷
**Lesson 4: Composition — How to Make Your Photos Look Professional**
We'll cover the **Rule of Thirds, leading lines, symmetry, framing, negative space, and how to position your subject**.Absolutely. Let’s continue with **Photography for Beginners — Lesson 3**. # 📸 Lesson 3: Understanding Camera Exposure Exposure is one of the most important concepts in photography. It determines **how bright or dark your photograph appears**. The three main elements controlling exposure are called the **Exposure Triangle**: 1. **Aperture** 2. **Shutter Speed** 3. **ISO** ### 1. Aperture — How Much Light Enters Aperture controls the size of the opening inside your lens. It is written as **f-numbers**, such as: * f/1.4 * f/2 * f/2.8 * f/4 * f/5.6 * f/8 * f/11 * f/16 **Important:** A smaller f-number means a **larger opening** and more light. For example: **f/1.8 → lots of light + blurry background** **f/11 → less light + more of the scene in focus** A wide aperture such as **f/1.8** is excellent for portraits because it can separate the person from the background. --- ### 2. Shutter Speed — How Long the Camera Captures Light Shutter speed determines how long your camera's shutter stays open. Examples: * 1/1000 sec → very fast * 1/500 sec → fast * 1/250 sec → moderate * 1/60 sec → relatively slow * 1 sec → very slow A **fast shutter speed** can freeze movement. 📸 Example: photographing a football player running. A **slow shutter speed** can create motion blur. 📸 Example: photographing moving water and creating a smooth, flowing effect. --- ### 3. ISO — Camera Sensor Sensitivity ISO controls how strongly your camera sensor responds to light. Common ISO values include: * ISO 100 * ISO 200 * ISO 400 * ISO 800 * ISO 1600 * ISO 3200 * ISO 6400 Generally: **Low ISO = cleaner image** **High ISO = brighter image but potentially more noise/grain** Use ISO 100–200 when there is plenty of light. Use higher ISO values when you're shooting in darker environments and need to maintain a usable shutter speed. --- ## 🔺 How the Three Work Together Imagine you're taking a portrait outdoors. You choose: **Aperture:** f/2.8 **Shutter:** 1/250 sec **ISO:** 100 This gives you: * A reasonably bright image * A blurred background * Enough shutter speed to reduce camera shake and subject movement * Low image noise But if your photograph is too dark, you could: * Open the aperture → f/2.8 to f/2 * Slow the shutter → 1/250 to 1/125 * Increase ISO → 100 to 200 The key is understanding **what you want to change creatively**, rather than simply making the image brighter. --- # 🎯 Beginner Exercise Take your camera or phone outside and photograph the **same subject three times**. ### Photo 1 — Aperture If your camera allows manual controls, keep ISO and shutter speed relatively constant and change the aperture. Try: **f/2.8 → f/5.6 → f/11** Look at how the background and overall brightness change. ### Photo 2 — Shutter Speed Photograph a moving subject using: **1/1000 → 1/250 → 1/30** Observe the difference in motion. ### Photo 3 — ISO Take the same photograph using: **ISO 100 → ISO 800 → ISO 3200** Zoom into the images and look for differences in **noise/grain**. --- ## 📝 What You Should Remember Think of the Exposure Triangle like this: **Aperture → controls light + depth of field** **Shutter Speed → controls light + motion** **ISO → controls brightness + image noise** Once you understand these three controls, you'll have much more creative control over your photography. ### Next Lesson 📷 **Lesson 4: Composition — How to Make Your Photos Look Professional** We'll cover the **Rule of Thirds, leading lines, symmetry, framing, negative space, and how to position your subject**.0 Commenti ·0 condivisioni ·1K Views ·0 Anteprima -
## 📸 Photography for Beginners — Lesson 2: Composition
Now that you understand the basics of the camera and exposure triangle, the next lesson is **composition**—how you arrange elements inside your photograph.
### 1. Rule of Thirds
Imagine your image divided into **9 equal sections**:
```text
┌───────┬───────┬───────┐
│ │ │ │
├───────┼───────┼───────┤
│ │ 👤 │ │
├───────┼───────┼───────┤
│ │ │ │
└───────┴───────┴───────┘
```
Instead of always placing your subject in the center, try placing it along one of the lines or at an intersection.
### 2. Leading Lines
Use lines to guide the viewer's eyes toward your subject.
Examples:
* Roads
* Bridges
* Buildings
* Fences
* Staircases
* Rivers
### 3. Framing
Put something around your subject to create a natural frame.
For example, photograph a person through:
* A doorway
* A window
* Tree branches
* An arch
### 4. Negative Space
Negative space is the empty area around your subject.
For example, if you're photographing someone looking toward the right, leave more empty space **in front of their face**.
This gives the photograph room to breathe.
### 5. Fill the Frame
Sometimes you should do the opposite—get close and remove distractions.
For portraits, try photographing:
* Face only
* Face and shoulders
* Upper body
* Full body
### 6. Change Your Perspective
Don't always photograph from eye level.
Try:
* **Low angle** → makes the subject feel powerful
* **High angle** → can make the subject feel smaller
* **Eye level** → natural and intimate
* **Side angle** → adds depth
* **Behind the subject** → creates storytelling
## 📸 Your First Assignment
For **AskJBoss Visuals**, take **10 photographs of one person**:
1. Center composition
2. Rule of thirds
3. Close-up
4. Full body
5. Low angle
6. High angle
7. Using leading lines
8. Using natural framing
9. With lots of negative space
10. Creative angle
Then choose your **best 3**.
For each one, ask yourself:
**“Where does my eye go first, and why?”**
### Next Lesson
**Lesson 3: Understanding Light — Natural Light, Golden Hour, Shadows & Portrait Lighting.**## 📸 Photography for Beginners — Lesson 2: Composition Now that you understand the basics of the camera and exposure triangle, the next lesson is **composition**—how you arrange elements inside your photograph. ### 1. Rule of Thirds Imagine your image divided into **9 equal sections**: ```text ┌───────┬───────┬───────┐ │ │ │ │ ├───────┼───────┼───────┤ │ │ 👤 │ │ ├───────┼───────┼───────┤ │ │ │ │ └───────┴───────┴───────┘ ``` Instead of always placing your subject in the center, try placing it along one of the lines or at an intersection. ### 2. Leading Lines Use lines to guide the viewer's eyes toward your subject. Examples: * Roads * Bridges * Buildings * Fences * Staircases * Rivers ### 3. Framing Put something around your subject to create a natural frame. For example, photograph a person through: * A doorway * A window * Tree branches * An arch ### 4. Negative Space Negative space is the empty area around your subject. For example, if you're photographing someone looking toward the right, leave more empty space **in front of their face**. This gives the photograph room to breathe. ### 5. Fill the Frame Sometimes you should do the opposite—get close and remove distractions. For portraits, try photographing: * Face only * Face and shoulders * Upper body * Full body ### 6. Change Your Perspective Don't always photograph from eye level. Try: * **Low angle** → makes the subject feel powerful * **High angle** → can make the subject feel smaller * **Eye level** → natural and intimate * **Side angle** → adds depth * **Behind the subject** → creates storytelling ## 📸 Your First Assignment For **AskJBoss Visuals**, take **10 photographs of one person**: 1. Center composition 2. Rule of thirds 3. Close-up 4. Full body 5. Low angle 6. High angle 7. Using leading lines 8. Using natural framing 9. With lots of negative space 10. Creative angle Then choose your **best 3**. For each one, ask yourself: **“Where does my eye go first, and why?”** ### Next Lesson **Lesson 3: Understanding Light — Natural Light, Golden Hour, Shadows & Portrait Lighting.**0 Commenti ·0 condivisioni ·1K Views ·0 Anteprima -
# 📸 Photography for Beginners
If you're just starting photography, focus on **understanding light, composition, and camera settings** before worrying about expensive equipment.
## 1. Understand the Exposure Triangle
The three most important camera settings are:
### ISO
Controls your camera's sensitivity to light.
* **ISO 100–200:** Bright outdoor conditions
* **ISO 400–800:** Shade or indoors
* **ISO 1600+:** Low-light situations
Higher ISO lets you shoot in darker conditions but can introduce **digital noise/grain**.
### Aperture — f-stop
Controls how much light enters the lens and affects background blur.
* **f/1.4–f/2.8:** Strong background blur
* **f/4–f/5.6:** Good for general photography
* **f/8–f/11:** More of the scene in focus
For portraits, try **f/2.0–f/2.8** if your lens allows it.
### Shutter Speed
Controls how long the camera captures light and affects motion.
* **1/1000:** Fast action
* **1/500:** Sports/movement
* **1/250:** People moving
* **1/125:** General handheld photography
* **1/60:** Slow movement; camera shake becomes more likely
* **1 second+:** Requires a tripod for sharp results
## 2. Learn Composition
Start with these simple techniques:
**Rule of Thirds**
Imagine your image divided into nine sections and place your subject along the lines or intersections.
**Leading Lines**
Use roads, buildings, walls, railings, or other lines to direct the viewer's eye toward your subject.
**Negative Space**
Leave empty space around your subject to create a cleaner, more powerful image.
**Framing**
Use doors, windows, trees, arches, or other objects to naturally frame your subject.
## 3. Learn to See Light
Photography literally means **drawing with light**.
Look at:
* Direction of the light
* Hard vs. soft light
* Shadows
* Highlights
* Color temperature
* Golden hour
For beginners, **morning and evening light** can be much easier to work with than harsh midday sunlight.
## 4. Start With Portrait Photography
Since you're developing **AskJBoss Visuals**, portraits are a great place to start.
Try this exercise:
**Location:** Outdoors
**Time:** About 1 hour before sunset
**Subject:** One person
**Lens:** 50mm or equivalent if available
**Aperture:** Around f/2.0–f/2.8
**ISO:** Keep it as low as practical
**Focus:** The person's nearest eye
Take the same portrait from:
1. Eye level
2. Slightly above
3. Slightly below
4. Close-up
5. Waist-up
6. Full body
Then compare the results.
## 5. Don't Buy Too Much Equipment
You can start with:
* Camera or smartphone
* One good lens
* Extra battery
* Memory card
* Basic tripod
* Reflector
You **don't need an expensive camera to learn photography**.
The photographer's ability to understand light and composition is more important than having the most expensive equipment.
## 6. Practice Challenge for 30 Days
### Week 1 — Camera
Practice ISO, aperture and shutter speed.
### Week 2 — Composition
Take photos using rule of thirds, leading lines, framing and negative space.
### Week 3 — Lighting
Photograph the same subject in morning, midday, afternoon and evening light.
### Week 4 — People
Practice portraits, candid photography and storytelling.
At the end of each week, choose your **five best photographs** and study why they worked.
### 📸 The most important beginner rule
**Don't just take more photographs—study the photographs you take.**
Ask yourself:
> *What makes this image good? What makes it weak? Where is the light coming from? Where does my eye go first? What would I change next time?*
That's how you develop your eye as a photographer.# 📸 Photography for Beginners If you're just starting photography, focus on **understanding light, composition, and camera settings** before worrying about expensive equipment. ## 1. Understand the Exposure Triangle The three most important camera settings are: ### ISO Controls your camera's sensitivity to light. * **ISO 100–200:** Bright outdoor conditions * **ISO 400–800:** Shade or indoors * **ISO 1600+:** Low-light situations Higher ISO lets you shoot in darker conditions but can introduce **digital noise/grain**. ### Aperture — f-stop Controls how much light enters the lens and affects background blur. * **f/1.4–f/2.8:** Strong background blur * **f/4–f/5.6:** Good for general photography * **f/8–f/11:** More of the scene in focus For portraits, try **f/2.0–f/2.8** if your lens allows it. ### Shutter Speed Controls how long the camera captures light and affects motion. * **1/1000:** Fast action * **1/500:** Sports/movement * **1/250:** People moving * **1/125:** General handheld photography * **1/60:** Slow movement; camera shake becomes more likely * **1 second+:** Requires a tripod for sharp results ## 2. Learn Composition Start with these simple techniques: **Rule of Thirds** Imagine your image divided into nine sections and place your subject along the lines or intersections. **Leading Lines** Use roads, buildings, walls, railings, or other lines to direct the viewer's eye toward your subject. **Negative Space** Leave empty space around your subject to create a cleaner, more powerful image. **Framing** Use doors, windows, trees, arches, or other objects to naturally frame your subject. ## 3. Learn to See Light Photography literally means **drawing with light**. Look at: * Direction of the light * Hard vs. soft light * Shadows * Highlights * Color temperature * Golden hour For beginners, **morning and evening light** can be much easier to work with than harsh midday sunlight. ## 4. Start With Portrait Photography Since you're developing **AskJBoss Visuals**, portraits are a great place to start. Try this exercise: **Location:** Outdoors **Time:** About 1 hour before sunset **Subject:** One person **Lens:** 50mm or equivalent if available **Aperture:** Around f/2.0–f/2.8 **ISO:** Keep it as low as practical **Focus:** The person's nearest eye Take the same portrait from: 1. Eye level 2. Slightly above 3. Slightly below 4. Close-up 5. Waist-up 6. Full body Then compare the results. ## 5. Don't Buy Too Much Equipment You can start with: * Camera or smartphone * One good lens * Extra battery * Memory card * Basic tripod * Reflector You **don't need an expensive camera to learn photography**. The photographer's ability to understand light and composition is more important than having the most expensive equipment. ## 6. Practice Challenge for 30 Days ### Week 1 — Camera Practice ISO, aperture and shutter speed. ### Week 2 — Composition Take photos using rule of thirds, leading lines, framing and negative space. ### Week 3 — Lighting Photograph the same subject in morning, midday, afternoon and evening light. ### Week 4 — People Practice portraits, candid photography and storytelling. At the end of each week, choose your **five best photographs** and study why they worked. ### 📸 The most important beginner rule **Don't just take more photographs—study the photographs you take.** Ask yourself: > *What makes this image good? What makes it weak? Where is the light coming from? Where does my eye go first? What would I change next time?* That's how you develop your eye as a photographer.0 Commenti ·0 condivisioni ·986 Views ·0 Anteprima -
# 🔥 CRAZY PRAISE — AUGUST
### Theme: **THANK YOU, LORD! 🙌🏽**
### 1. Opening — A Heart of Thanksgiving
> I come before You today
> And there is just one thing I just want to say:
> **Thank You, Lord! ×4**
>
> With a grateful heart
> With a song of praise
> I come before You, Lord.
**Build the atmosphere with spontaneous thanksgiving.**
### 2. I Will Sing Unto the Lord
> I will sing unto the Lord a joyful song
> I will praise His name
> For the Lord is good.
Repeat and allow the congregation to respond.
### 3. Too Many Reasons 🔥
> I've got too many reasons
> To give You praise, oh God
> You are good! ×4
**Leader:** You've been faithful!
**People:** You've been good!
**Leader:** You've kept us!
**People:** You've been good!
### 4. Aba Father — He Has Done It
> Even before I prayyy
> **Aba Father, answer me!**
>
> **Tobechukwu, He has done it for me! ×4**
Then move into spontaneous praise:
> When you were worried and couldn't sleep
> **Aba Father finish work for you oooh!**
>
> **Tobechukwu, He has done it for me!**
>
> See the way He answered me oooh!
> **Tobechukwu, He has done it for me!**
🔥 **This is where the praise can really explode.**
### 5. My God, Oh Mine! 🙌🏽
> My God... oooh mine!
> Oooh mine God...
> You are good!
>
> **My God... oooh mine!
> Oooh mine God...
> You are good!**
Repeat faster and encourage everyone to dance.
### 6. Oga O — O Tobi
> **Oga O! O Tobi!**
> Oga Eledumare
> Ga ju aiye lo!
>
> **Oga oooh! O Tobi!
> Oga Eledumare
> Ga ju gbogbo aiye lo!**
### 7. Finale — Praise the Lord 🔥🔥
> **Praise the Lord!**
> Praise the Lord!
>
> **Praiseeeee the Lord!
> Praise the Lord!**
>
> He has done great things!
> He has done mighty things!
> He has been faithful to us!
>
> **Praiseeeee the Lord!
> Praise the Lord!**
### 🔥 PRAISE FLOW
**THANK YOU LORD → I WILL SING → TOO MANY REASONS → ABA FATHER → TOBECHUKWU → MY GOD → OGA O → PRAISE THE LORD**
The flow moves from **quiet thanksgiving → joyful praise → testimony → high-energy African praise → celebration**.# 🔥 CRAZY PRAISE — AUGUST ### Theme: **THANK YOU, LORD! 🙌🏽** ### 1. Opening — A Heart of Thanksgiving > I come before You today > And there is just one thing I just want to say: > **Thank You, Lord! ×4** > > With a grateful heart > With a song of praise > I come before You, Lord. **Build the atmosphere with spontaneous thanksgiving.** ### 2. I Will Sing Unto the Lord > I will sing unto the Lord a joyful song > I will praise His name > For the Lord is good. Repeat and allow the congregation to respond. ### 3. Too Many Reasons 🔥 > I've got too many reasons > To give You praise, oh God > You are good! ×4 **Leader:** You've been faithful! **People:** You've been good! **Leader:** You've kept us! **People:** You've been good! ### 4. Aba Father — He Has Done It > Even before I prayyy > **Aba Father, answer me!** > > **Tobechukwu, He has done it for me! ×4** Then move into spontaneous praise: > When you were worried and couldn't sleep > **Aba Father finish work for you oooh!** > > **Tobechukwu, He has done it for me!** > > See the way He answered me oooh! > **Tobechukwu, He has done it for me!** 🔥 **This is where the praise can really explode.** ### 5. My God, Oh Mine! 🙌🏽 > My God... oooh mine! > Oooh mine God... > You are good! > > **My God... oooh mine! > Oooh mine God... > You are good!** Repeat faster and encourage everyone to dance. ### 6. Oga O — O Tobi > **Oga O! O Tobi!** > Oga Eledumare > Ga ju aiye lo! > > **Oga oooh! O Tobi! > Oga Eledumare > Ga ju gbogbo aiye lo!** ### 7. Finale — Praise the Lord 🔥🔥 > **Praise the Lord!** > Praise the Lord! > > **Praiseeeee the Lord! > Praise the Lord!** > > He has done great things! > He has done mighty things! > He has been faithful to us! > > **Praiseeeee the Lord! > Praise the Lord!** ### 🔥 PRAISE FLOW **THANK YOU LORD → I WILL SING → TOO MANY REASONS → ABA FATHER → TOBECHUKWU → MY GOD → OGA O → PRAISE THE LORD** The flow moves from **quiet thanksgiving → joyful praise → testimony → high-energy African praise → celebration**. 0 Commenti ·0 condivisioni ·516 Views ·0 Anteprima
 -
Here’s a clean, organized “Crazy Worship – August” worship flow, while keeping your repetitions and spontaneous worship sections.
# 🔥 CRAZY WORSHIP — AUGUST
### Theme: **HOLY — THE EARTH IS FULL OF YOUR GLORY**
### 1. Opening — You Are Holy
> You are holy, Lord God Almighty
> The earth is full of Your glory.
Repeat and build gradually.
### 2. Standing Before the Throne
> Standing before the throne, there are no words to say
> But **Holy, Holy, Holy** ×8
>
> You are holy, Lord God Almighty
> The earth is full of Your glory ×9
### 3. Spontaneous Worship — Iba
> You are eminently glorious
> Immaculately beautiful
> We can go on and on, on and on, on and on
> But my words are not enough
> My vocabulary will fail me
> Permit me to cry out...
>
> **Iba oooh, ibaaa!** ×12 🔥
### 4. Yahweh Sabaoth
> The Lord of Hosts
> The King of Glory
>
> **Yahweh Sabaoth ×2**
Allow the worship to flow spontaneously here.
### 5. Spiritual Chant
> **Tiririri riririr
> Tiri riririri...**
Build the atmosphere before moving into the next song.
### 6. Your Name Is the Highest
> Your name is the highest
> Your name is the greatest
> Your name stands above them all
>
> All thrones and dominions
> And power and positions
> Your name stands above them all.
### 7. Holy Forever
> And the angels cry: **Holy**
> All creation bow: **Holy**
> You will always be: **Holy**
> **Holy forever.**
This can be a strong congregational worship moment.
### 8. Jesu Oh
> Jesu oh, oh Jesu
> Oloruko Aperire
> Jesu oh ×2
>
> **Jesuu ooooh Jesu ×7**
### 9. E Ti Tobi To O, Jesu
> Gbogbo aye n wariri ni oruko Re
> Won n k'orin:
> **E ti tobi to o, Jesu**
>
> Awon orun na n s'eleri
> Won n f'oribale niwaju ite Re o
> **E ti tobi to o, Jesu**
>
> **E ti tobi to o
> Oh oh oh oh Oluwa wa
> E ti tobi to o, Jesu**
### 10. Unto the Lamb
> Unto the Lamb upon the throne
> We raise a sound ×2
> For You are God and God alone.
>
> **Hallelujah! Hallelujah!**
### 11. Thanksgiving — Halleluyah
> **Halleluyah eeee, eee, eee ×2**
> We are grateful
> **Eeeh, eeeh, eeeeh!**
Let the congregation respond freely here.
### 12. Finale — Lift His Name Higher 🔥
> We lift Your name
> **Higher! Higher! Higher!**
>
> Shout Halle!
> **Hallelujah! Hallelujah! Hallelujah!**
## 🔥 Suggested Worship Progression
**HOLY → THRONE → IBA → YAHWEH SABAOTH → CHANT → HIS NAME → HOLY FOREVER → JESU → E TI TOBI → THE LAMB → HALLELUJAH → HIGHER**
This gives you a natural progression from **deep reverence → spiritual intensity → celebration and thanksgiving**.Here’s a clean, organized “Crazy Worship – August” worship flow, while keeping your repetitions and spontaneous worship sections. # 🔥 CRAZY WORSHIP — AUGUST ### Theme: **HOLY — THE EARTH IS FULL OF YOUR GLORY** ### 1. Opening — You Are Holy > You are holy, Lord God Almighty > The earth is full of Your glory. Repeat and build gradually. ### 2. Standing Before the Throne > Standing before the throne, there are no words to say > But **Holy, Holy, Holy** ×8 > > You are holy, Lord God Almighty > The earth is full of Your glory ×9 ### 3. Spontaneous Worship — Iba > You are eminently glorious > Immaculately beautiful > We can go on and on, on and on, on and on > But my words are not enough > My vocabulary will fail me > Permit me to cry out... > > **Iba oooh, ibaaa!** ×12 🔥 ### 4. Yahweh Sabaoth > The Lord of Hosts > The King of Glory > > **Yahweh Sabaoth ×2** Allow the worship to flow spontaneously here. ### 5. Spiritual Chant > **Tiririri riririr > Tiri riririri...** Build the atmosphere before moving into the next song. ### 6. Your Name Is the Highest > Your name is the highest > Your name is the greatest > Your name stands above them all > > All thrones and dominions > And power and positions > Your name stands above them all. ### 7. Holy Forever > And the angels cry: **Holy** > All creation bow: **Holy** > You will always be: **Holy** > **Holy forever.** This can be a strong congregational worship moment. ### 8. Jesu Oh > Jesu oh, oh Jesu > Oloruko Aperire > Jesu oh ×2 > > **Jesuu ooooh Jesu ×7** ### 9. E Ti Tobi To O, Jesu > Gbogbo aye n wariri ni oruko Re > Won n k'orin: > **E ti tobi to o, Jesu** > > Awon orun na n s'eleri > Won n f'oribale niwaju ite Re o > **E ti tobi to o, Jesu** > > **E ti tobi to o > Oh oh oh oh Oluwa wa > E ti tobi to o, Jesu** ### 10. Unto the Lamb > Unto the Lamb upon the throne > We raise a sound ×2 > For You are God and God alone. > > **Hallelujah! Hallelujah!** ### 11. Thanksgiving — Halleluyah > **Halleluyah eeee, eee, eee ×2** > We are grateful > **Eeeh, eeeh, eeeeh!** Let the congregation respond freely here. ### 12. Finale — Lift His Name Higher 🔥 > We lift Your name > **Higher! Higher! Higher!** > > Shout Halle! > **Hallelujah! Hallelujah! Hallelujah!** ## 🔥 Suggested Worship Progression **HOLY → THRONE → IBA → YAHWEH SABAOTH → CHANT → HIS NAME → HOLY FOREVER → JESU → E TI TOBI → THE LAMB → HALLELUJAH → HIGHER** This gives you a natural progression from **deep reverence → spiritual intensity → celebration and thanksgiving**.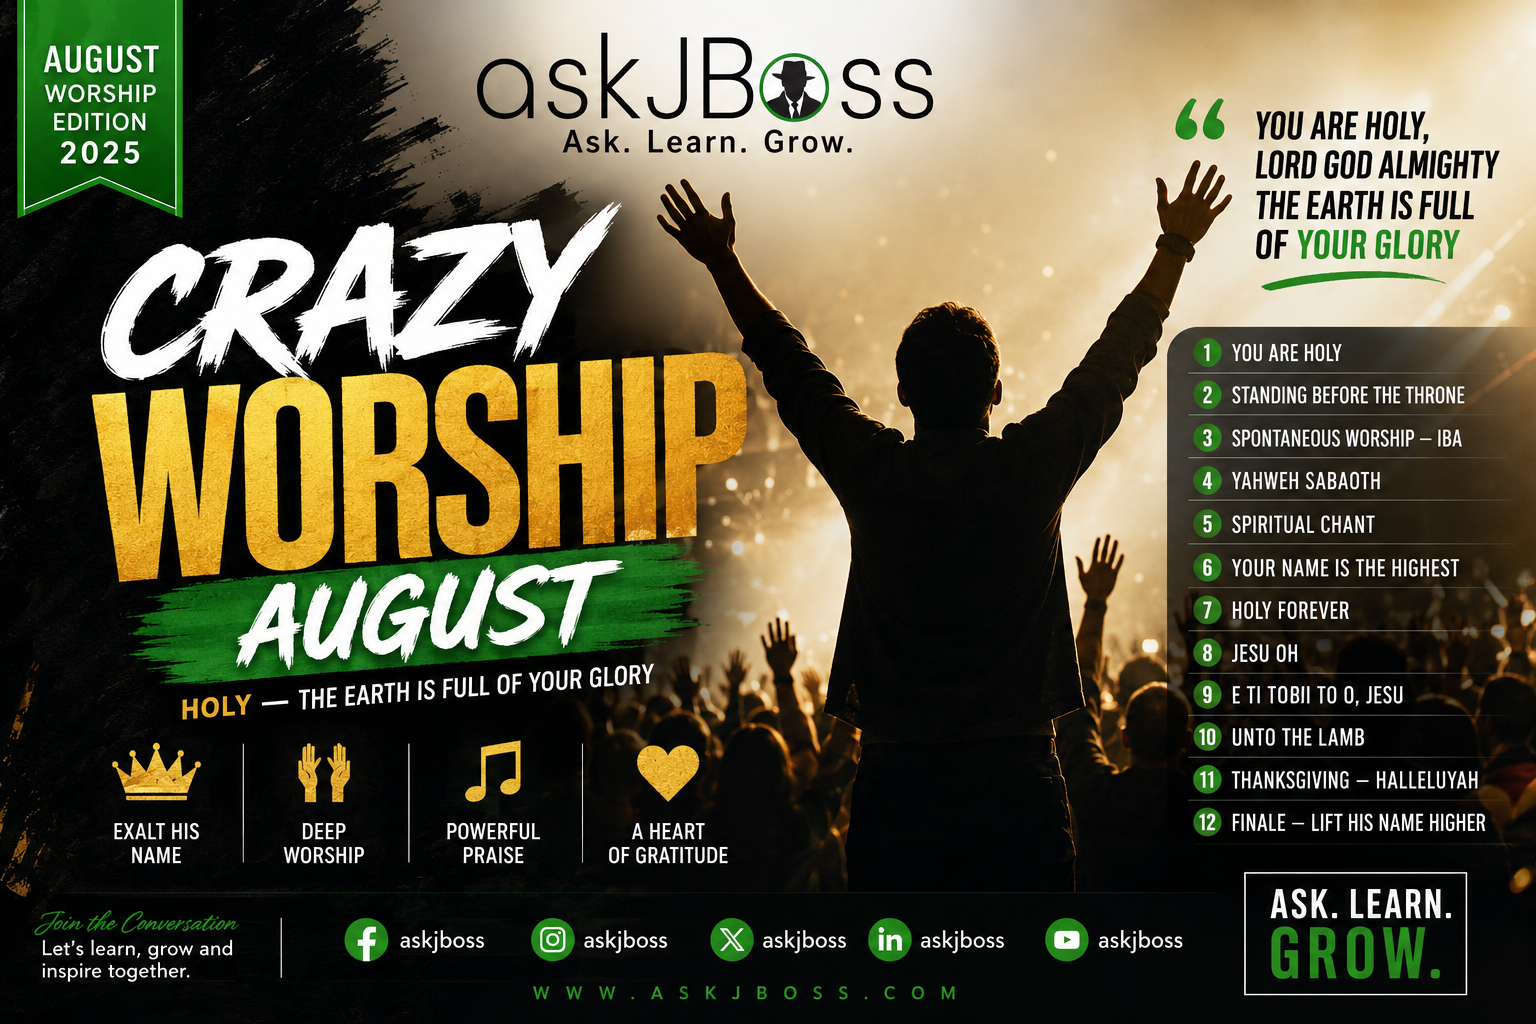 0 Commenti ·0 condivisioni ·391 Views ·0 Anteprima
 -
AskJBoss Visuals is my creative photography and visual storytelling brand. I started it because I’ve always been passionate about capturing people, moments, and stories through photography. I enjoy turning ordinary moments into memorable images, with a focus on portraits, lifestyle, events, fashion, and creative photography.AskJBoss Visuals is my creative photography and visual storytelling brand. I started it because I’ve always been passionate about capturing people, moments, and stories through photography. I enjoy turning ordinary moments into memorable images, with a focus on portraits, lifestyle, events, fashion, and creative photography.0 Commenti ·0 condivisioni ·466 Views ·0 Anteprima
Altre storie